- The easiest way to zoom in or out of Word 2010 documents is to hold down the control key on your keyboard (Ctrl) and scroll your mouse wheel up (zoom in) or down (zoom out).
- The zoom slider (bottom right) shows the current zoom factor (if you don't see it, right-click on the status bar (bottom of Microsoft Word window), and choose "Zoom Slider" from the menu).

- You can also click on the "(-)" minus / "(+)" plus sign buttons pictured above to decrease or increase zoom level, or drag the slider: it automatically stops at common levels, like
100%.
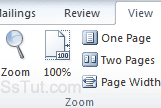
- Named zoom factors are also available under the "View" tab in the Ribbon:

- Click on the "Zoom" button to open the eponymous dialog, which lets you enter a custom zoom factor, in addition to predefined settings: (equivalent keyboard shortcut = Alt+W, Q) ⇒ "200%" = twice as large.
⇒ "100%" = reset zoom (default setting, no zooming - see further below for an easier approach).
⇒ "75%" = zoom out just a bit.
⇒ "Page width": the "sheet" becomes as wide as the entire window.
⇒ "Text width": the document is zoomed in so that your paragraphs start and end along the edges of the Microsoft Word window.
⇒ "Whole page": zooms out to fit an entire page inside the main window's dimensions.
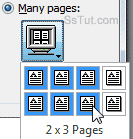
⇒ "Many pages" lets you choose a number of rows and columns to display multiple pages at the same time, like table cells; just click on the button and move your cursor to make your choice:
- Once you've made your choice, click "OK" to apply it.
- Click on the "100%" button to reset the zoom to "none" (or hit the Alt+W, J keyboard shortcut).
- The three following buttons in the Ribbon give you one-click access to named or custom zoom factors we just saw in the Zoom dialog: "One Page" (same as "whole page"), "Two Pages" (same as "Many pages > 1x2", and "Page Width" (exact same option as Zoom dialog).
Email AOL Mail Gmail Hotmail Yahoo Mail MS Office Excel 2010 OneNote 2010 Outlook 2010 Word 2010 OS & Devices Kindle Fire Windows 7 Web Dev C# and .NET JavaScript jQuery