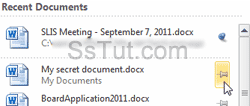
- Word 2010 keeps track of recent documents for convenience; whenever you open or re-open a file, it is placed at the top of the list (with some exceptions, see next point, below).
Tip: press Alt+F to open Backstage view, and press "R" to display recent files.
- Important or common documents can be "pinned" to the Backstage view, so that they'll remain visible at the top of the Recent Documents listing at all times. Just click on the pin icon next to the document in question. To unpin it, click its pin icon once more.

- To change the number of recent documents, click on "File" and choose "Options". Select "Advanced" on the left and scroll down until you see "Display". Enter a number between zero and a maximum of
50recent documents (the default is "25"). Click "OK" to apply.
- Word also lets you add recent files directly onto the "File" menu: select "Recent", and check the "Quickly access this number of recent documents" checkbox at the bottom: keep the default of
4, or increase it up to the limit you set above (or the default length of25).
- To clear your recent documents history, right-click on any of them an choose "Clear unpinned documents". For pinned documents, or to selectively remove some files from your recent list, right-click on the file in question and choose "Remove from list".
Tip: Word 2010 doesn't automatically delete recent files not found because they might be saved on a network not available at the moment, but still valid when you connect to it.
- Notice that the right column shows "Recent Places": these are recent folders and network locations you can conveniently re-access with a click; you can also pin these directories.
Tip: "Recover Unsaved Documents" (bottom right) lets you to re-open files not saved properly, like Windows restarting automatically after updates, with Microsoft Word left open.
Email AOL Mail Gmail Hotmail Yahoo Mail MS Office Excel 2010 OneNote 2010 Outlook 2010 Word 2010 OS & Devices Kindle Fire Windows 7 Web Dev C# and .NET JavaScript jQuery