- Page breaks guarantee that text/tables start or end on a blank page, on screen and print.
Tip: unlike section breaks, page breaks don't affect formatting (only force-start a new page).
- To manually insert a page break at insertion point, hit the "Ctrl+Enter" keyboard shortcut.
- To automatically add page breaks, click on paragraph options in the Ribbon's Home tab:

Note: select the entire document (Ctrl+A) to apply these page breaks to all paragraphs.
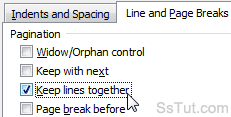
- Select the "Line and Page Breaks" tab, and choose your page break type.

• "Widow / Orphan control" ensures that at least two lines of a paragraph show on a page, otherwise makes it start on the next page.
• "Keep with next" forces one paragraph to end and the next to start on the same page (an "anti" page break, in a sense).
• "Keep lines together" creates an unbreakable paragraph (unless it exceeds the length of a page). If needed, that paragraph will stand on its own page.
• "Page Break Before" automatically adds a page break before the paragraph. - Click "OK" to apply.
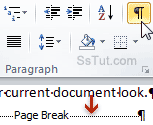
- To show all page breaks in your document, press "Ctrl+*" to display hidden formatting marks - or click on the pilcrow button in the Home tab, under the Paragraph group:

- To delete a page break, place your cursor after it and press Backspace. (To remove all automatic breaks, select all or part of your document, and go back to paragraph options: uncheck the appropriate checkboxes, and click "OK".)
Email AOL Mail Gmail Hotmail Yahoo Mail MS Office Excel 2010 OneNote 2010 Outlook 2010 Word 2010 OS & Devices Kindle Fire Windows 7 Web Dev C# and .NET JavaScript jQuery