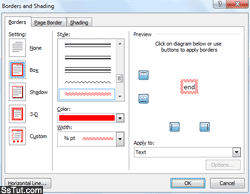
- Aside from tables, Word 2010 doesn't apply automatic borders around text like paragraphs or bulleted list items, but you can add them manually, and even create your own border styles.
Tip: if you want to demarcate parts of your document, look instead at horizontal border lines.
- To create a border around a word, double-click on it to select it, or select a sentence. To add a border around a single paragraph, just place your cursor inside it; for multiple paragraphs, select the ones you want. To surround a list or bulleted item with borders, select either.
- Then, make sure that the "Home" tab is selected in the Ribbon, and click the "Borders" button.

Tip: press Alt+H to select the Home tab and press "B" to show the Borders menu.
- Pick Bottom / Top / Left / Right Border to add it on only one side; choose "All Borders" or "Outside Borders" to surround the current element or selected text with borders on all sides.
Tip: select text (or place your cursor) and click "No Border" to remove borders after the fact.
- Note: options like "Inside [horizontal / vertical] Border(s)" only apply to tables and cells.
Note: Pick "Horizontal Line" to insert a separator between portions of text in your document. - To customize the color, thickness, and style of your border, launch the "Borders and Shading" dialog box (last option). Configure your settings and click "OK" to apply. Word 2010 "remembers" your border style between one click and the next, and clicking on the Borders button itself (vs. the dropdown arrow) will automatically re-use the last setting you picked!

Tip: to add a border around the document / page, select the "Page Layout" tab and click "Page Borders". Customize colors, width, or "Art" to use images, and click "OK" to apply.
Email AOL Mail Gmail Hotmail Yahoo Mail MS Office Excel 2010 OneNote 2010 Outlook 2010 Word 2010 OS & Devices Kindle Fire Windows 7 Web Dev C# and .NET JavaScript jQuery