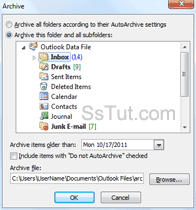
- To manually archive your old emails, click on "File" (top left), and select "Info".
- Click on "Cleanup Tools" on the right, and select "Archive".
- Then, select the email folder to be archived, along with its subfolders.

- Pick a date limit in the "Archive items older than" dropdown.
- As explained below, you can exclude some folders from AutoArchiving: if you want to include them this one time, check the "Include items with Do not AutoArchive checked" checkbox.
- To pick your own PST file, enter a new path and file name in the "Archive file" text box.
- Click "OK" to launch the process.
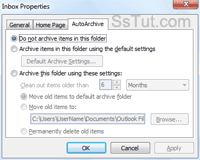
- To exclude a folder from AutoArchive, right-click on the folder and choose "Properties".

- Select the "AutoArchive" tab and customize your settings.
- Click "OK" to apply, and repeat for each folder to exclude.
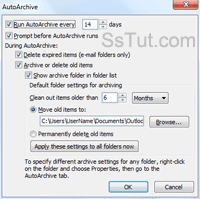
- To configure your global AutoArchive settings, click on "File" and choose "Options".
- Select "Advanced" on the left, and click the "AutoArchive Settings" button on the right.

- Check the "Run AutoArchive every" checkbox if needed, and choose how often it should automatically run (uncheck it to disable AutoArchive - you can still archive manually).
- We recommend keeping the default, which will give you a chance to postpone the auto-archival process, archive items older than 6 months.
- To remove old emails (not recommended), select "Permanently delete old items".
- To make these the default options, click on the "Apply these settings to all folders now".
- Click "OK" to save your settings, and "OK" once more to close Options.
Email AOL Mail Gmail Hotmail Yahoo Mail MS Office Excel 2010 OneNote 2010 Outlook 2010 Word 2010 OS & Devices Kindle Fire Windows 7 Web Dev C# and .NET JavaScript jQuery